From Theory to Code: A Deep Dive into Molecular Extended-Connectivity Fingerprints (ECFPs) with Python

ecfp-diagram
Source: https://docs.chemaxon.com/display/docs/extended-connectivity-fingerprint-ecfp.md

What Are Molecular Fingerprints and ECFPs?

Molecular fingerprints are representations that encode key functionalities and properties of chemical compounds. They were originally designed for substructure search in databases, but later gained popularity for similarity searching and molecule clustering.

Extended-connectivity fingerprints (ECFPs) are a type of molecular fingerprint specifically designed for predicting and analyzing molecular activity and properties. First introduced in 2000, they have since been widely adopted across various fields. (Interestingly, they are conceptually similar to convolutional operations: like the convolution operator in CNNs that apply the same function in all directions before global pooling, ECFPs use iterative circular hashing to capture local chemical environments before proceeding to a global pooling step.)

ECFPs aim to represent precise substructural features relevant to properties like solubility and biological activity. Key aspects covered here include:

  • Their generation via iterative hashing to capture varying-size circular substructures around atoms
  • Comparison to other fingerprint methods
  • Applications in virtual screening, QSAR modeling, and library analysis
  • Implementation from scratch in code using Python, and using open-source tools

ECFP Generation Process - Overview

The ECFP algorithm works by iteratively hashing circular substructures of increasing size around each non-hydrogen atom. There are three main stages (each process occurs for every atom in the molecule):

Step 1 – Initial Atom Assignment

  • Atoms have integer IDs assigned to them (generated from a hash function, based on properties like atomic number and ring membership). These are collected into an initial fingerprint set.

Step 2 – Iterative Updating

  • In this stage, each atom identifier is updated to reflect the identifiers of each atom’s neighbors
  • At each iteration, new IDs are calculated from neighbor IDs by hashing an array that contains its the current atom identifier, the neighboring atom identifiers and the corresponding connectivity, order, and bond type.
  • For every iteration, as the context diameter increases, larger and larger circular substructures are represented

Step 3 – Duplicate Removal

  • During this stage, multiple occurrences of identical features/substructural regions are reduced to a single feature (alternatively, the counts of the redundant feature can be kept if one desires to have a set of counts as opposed to a standard binary/one-hot encoded fingerprint)

The number of iterations controls the maximum feature size and fingerprint complexity. For example, ECFP_6 has a maximum diameter of 6 bonds. An overview of this process for benzoic acid amide (benzamide) is depicted in the figure below. At the beginning of the process, the initial identifier only represents information about the atom itself and its attached bonds (the “A” atom type represents an arbitrary attachment atom). After one iteration, the identifier now contains information about immediate neighbors. After two iterations, the identifier contains information for a larger substructure (including the amide group plus the aromatic ring).

ecfp-6-benzamide
Illustration of the effect of iterative updating on the information represented by an atom identifier, considering atom 1 in benzamide. Each iteration has the effect of creating an identifier that represents larger and larger circular substructures around the central atom. Source: https://pubs.acs.org/doi/10.1021/ci100050t

The iterative updating process enables a local operation in an atomic environment to capture information that represents larger substructures. Initially, the atom identifiers only encode information about the atom itself and its direct bonds. However, by collecting the identifiers of neighboring atoms at each step, the substructure captured rapidly expands outwards from the central atom.

So while the updates use only local neighbor information, this results in atomic identifiers that can represent quite substantial circular substructures. Since the process runs on all atoms, the final fingerprint contains a mixture of small common substructures from the initial iteration as well as large, precise substructures like specific substituted ring systems from later iterations.

Controlling the number of iterations allows fine-tuning the fingerprint – fewer iterations for smaller, more generic features versus more iterations for larger, more specific features. This control over feature size and specificity is a key advantage of the ECFP design.

Below, we will dive deeper into each step.

ECFP Step 1 - Initial Assignment of Atom Identifiers

The first step in generating ECFPs is assigning each non-hydrogen atom a unique integer ID to serve as its initial identifier. These IDs should encode key atomic properties while being independent of atom order/numbering.

Properties Encoded

For standard ECFPs, the properties hashed are:

  • Atomic number
  • Heavy atom neighbor count
  • Valence (minus number of hydrogens)
  • Total attached hydrogen count
  • Ring membership
  • Atomic charge

These properties (with the exception of ring membership) are taken from the Daylight atomic invariants rule and are independent of initial atom numbering. They are then hashed into a 32-bit integer. For example, the carboxylic acid carbon in butyramide in the figure below gets an initial ID of -1100000244. (Depending on the choice of hash, an identifier can be a positive or negative number. Any hash function can be chosen, as long as it yields integers for atoms and is independent of atom numbering. We’ll discuss this more in detail below.)

ecfp-butyramide-initial
“The initial atom identifiers for butyramide, calculated using the Daylight atomic invariants-derived rule.”

Variant Fingerprints

Other property rules give fingerprint variants like:

  • FCFP: Pharmacophore roles (as opposed to ECFPs, which intend to capture precise environment substructures, FCFPs aim to capture abstract role-based substructures)
  • SCFP: Sybyl atom types
  • LCFP: AlogP atom codes

The naming convention is a 4-character base (ECFP) plus number of iterations (ECFP_6). The number of iterations impacts the effective coverage diameter for the largest possible feature: i.e., the effective diameter of the largest feature is equal to twice the number of iterations (if three iterations are performed, the largest possible substructure feature will have a width of 6 bonds).

Initializing Fingerprint

The initial IDs for all atoms comprise the starting fingerprint set. For butyramide this set is:

[734603939, 1559650422, 1559650422, -1100000244, 1572579716, -1074141656]

Each atom also tracks the bonds currently represented in its feature (this starts as an empty set during initialization and will grow as the algorithm proceeds through the iterative updating steps).

ECFP Step 2 - Iterative Updating of Identifiers

Iterative updating enables the creation of new, larger features by incorporating connectivity and neighboring atoms to represent larger circular substructures centered on each atom.

Process

To update an atom’s ID in each iteration:

  1. Create array with iteration number and current atom ID
  2. Sort neighbors by bond order and neighbor atom ID
  3. Append the (neighbor ID, bond order) pairs to the array
  4. (Optional) Add stereochemistry flags
  5. Hash array into new 32-bit ID, which serves as the new ID for the current atom

Continuing with carbon 4 in butyramide, we initialize the array to:

[1, -1100000244]

1 is for the current iteration, and -1100000244 is the initial atom ID for carbon 4 (calculated using the hash function of the “daylight” extracted features from the section above).

For each non-hydrogen neighbor atom to carbon 4, two numbers are appended to the array:

  1. The bond order to that neighbor, encoded as integers (1 = single, 2 = double, 3 = triple, 4 = aromatic)
  2. The current identifier of the neighbor atom

To ensure consistency, the neighbors are sorted by these number pairs before appending them. This establishes a deterministic order independent of atom indexing.

In the butyramide example (the figure above), atom 4 has three neighbors. The sorted pairs are:

  • (1, 1559650422) – Single bond to atom 2
  • (1, 1572579716) – Single bond to atom 5
  • (2, -1074141656) – Double bond to atom 6

After appending the sorted pairs, the final array contains eight elements:

[1, -1100000244, 1, 1559650422, 1, 1572579716, 2, -1074141656]

Hashing this final array gives the new ID -1708545601 for carbon 4, which now encodes the first-level connectivity/features. Repeating this process for each atom in butyramide yields the following array (represented in the figure below):

[734603939, 1559650422, 1559650422, -1100000244, 1572579716, -1074141656, 863188371, -1793471910, -1789102870, -1708545601, -932108170, 2099970318]

“Generation of new identifiers by performing one iteration using butyramide. The initial atom identifiers are shown on the molecule on the left; after the updating process, each atom is given a new identifier, shown on the molecule on the right.”

Expanding Substructural Features

As iterations increase, the atom IDs represent larger circular substructures outward from the central atom.

For instance, in butyramide, the ID for oxygen (atom 6) goes from representing a double-bonded oxygen initially to a carbonyl after one iteration to a full aliphatic carboxylic acid amide substructure after two iterations (see figure below).

ecfp-expanding-substructure
“Effect of the iteration process on information stored in the identifier of the oxygen atom in butyramide. (The “A” atom type can map onto any atom type and is the only atom that may have connections that are not specified.) The sphere shows the feature region represented in the identifier after the given number of iterations. After zero iterations, only information about the atom itself and its connectivity are available. After one iteration, the identifier contains information from the core atom’s immediate neighbors; in this case a carbonyl. After two iterations, atoms within two bonds of the core atom are included. At this point, it represents an aliphatic carboxylic acid amide, with no substituents on the nitrogen atom and exactly one substituent on the R carbon.”

Controlling Feature Size

The number of iterations controls the maximum feature size. More iterations allow larger maximum diameter but take longer to compute. Values of 2-4 are typical.

ECFP Step 3 - Duplicate Removal

Duplicate Structure Removal

As the iteration process expands the circular substructures represented by atom identifiers, it becomes possible for different starting atoms to end up encoding the same structural regions in the molecule. This situation is termed structural duplication – where two atom-centered environments represent an identical substructural unit, despite having different hashed identifiers. (This can occur because at the start, different atoms may have different identifiers due to the hash function, and thus as the iterations proceed, if duplicate structures are present, they may have different hashed IDs.)

For example, in benzoic acid amide, the oxygen and nitrogen atoms both end up representing the same amide substructure after two iterations (see figure below). Their identifiers are different but the underlying bonds covered are equivalent.

benzamide-duplicate-structure
“The feature regions after two iterations centered on the oxygen (left) and the nitrogen (right). Since both of these regions contain exactly the same atoms and bonds, they represent duplicate information, even though their hashed identifier values are different.”

This duplication needs to be addressed to avoid adding redundant features to the final fingerprint. The goal is to eliminate repetition to keep the fingerprint concise while retaining all uniquely represented structural fragments.

Identifying Duplicates

To detect duplication, each feature tracks the set of bonds representing its substructure. At each iteration, this set is updated to include:

  • Bonds from previous iteration
  • Bonds to neighbor attachments
  • Bonds between attachments

Before the newly generated features from an iteration are appended to the fingerprint set, they are checked to see if any structural duplicates exist to either previously generated features or newly discovered features. When two features are discovered to be from equivalent bond sets, the following rules are used to remove one:

Removal Rules

When duplicate features are found:

  1. If generated from different iterations, prefer the feature generated from fewer iterations
  2. If generated from the same number of iterations, discard the feature represented by the larger ID

Following these rules avoids useless redundancy in the final fingerprint.

Impact on Feature Count

Duplicate removal causes fewer new features in later iterations. For butyramide, there are:

  • 5 initial features
  • +6 after iteration 1
  • +3 after iteration 2

After iteration 2, there are no new features, as the full molecule has been covered (see figure below, showing the final features for butyramide).

butyramide-final-features
“The structures represented by the features of butyramide after duplicate removal. The molecule generates five features (that is, unique atom identifiers) in the initial assignment stage, six additional features after one iteration, and three features after two iterations. Further iterations generate no new features. (The central atom for the figure is denoted by having its atom number shown.)”

Duplicate Identifier Removal

In some cases, the final fingerprint contains duplicate identifiers representing identical features. This happens when the same substructure occurs multiple times in the molecule.

For example, different methyl groups may generate the same initial ID and iterated IDs. A feature could also collide to the same bit identifier as another feature.

Handling Duplicates

There are two approaches:

  1. Remove duplicate IDs for a condensed fingerprint
  2. Retain duplicate IDs and represent them as counts (this approach captures multiplicity)

For the standard ECFP, duplicates are removed to keep the fingerprint concise. The absence of a “bit” in the ECFP fingerprint representing a feature means that the feature is not present. On the other hand, the presence of a “bit” in the ECFP fingerprint representing a feature is only suggestive and indicates it likely occurs in the molecule. This is because collisions can occur, meaning there could be other representations mapping to the same ID. This collision handling maximizes use of the large identifier space to represent many possible features. (See the main image of this post at the top for an example of IDs represented as bits and bit collisions.)

Overall, the iteration and duplicate removal stages yield a rich, concise structural description containing up to billions of possible features to characterize molecules.

Hash Function & Interpretation

Choosing the Hash Function

Any reasonable hash function can be used to generate identifiers, as long as it can map arrays of integers randomly and uniformly into a 232-bit space of possible integers. If the hash function can’t map integers uniformly, then the collision rate (i.e., when multiple IDs map to the same “bit”) may increase leading to a loss of information.

A larger space (e.g. 64-bit integers) could reduce collisions, but in practice there is no measurable improvement in analysis.

Additionally, there are hardware considerations: for example, 64-bit operations are slower on 32-bit hardware. So 32-bit integers provide the best tradeoff between identifier uniqueness and computational performance.

The output space and randomness/uniformity are what primarily matter rather than the exact hashing algorithm used.

Interpreting ECFP Identifiers

While the numeric identifiers themselves contain no inherent structural/semantic information/meaning, it is possible to map features to the underlying substructures they represent.

Conceptualizing Identifiers

Identifiers can be considered:

  • Indices of bits in a large bit array, or
  • Keys in a hash table

But the fingerprint is stored as a list, not explicitly expanded out:

  • The fingerprints are stored as lists of integer IDs representing the “on” features. They are not explicitly stored as long bit vectors with zeros everywhere and 1s for those IDs.

Explicitly writing out all 232 bits, when only a small fraction would be non-zero for a given molecule is inefficient. So instead, only the nonzero “on” features, represented as integer IDs, are tracked in the list for storage and manipulation. This variable-length list contains the pertinent data in a compact representation.

The bitset interpretation is an analogy rather than an implementation detail. At runtime, the integers are manipulated directly as hash table keys or array indices rather than as physical bit vectors. Software like RDKit can convert these to bit vectors when preparing a dataset for analysis or modeling.

Regenerating Substructures

During fingerprint generation, each feature tracks:

  • Atoms covered
  • Bonds covered

This can be used to regenerate the substructure later, represented as a SMARTS string (see figure below).

“At the time of fingerprint calculation, additional information about the substructure represented by each identifier is available. This example uses butyramide, shown on the left. The bits of the ECFP_6 fingerprint are shown in the first column. The second column contains a set of atoms that were represented by the corresponding ECFP_6 bit. (Sets of atoms leading to duplicate features are not included in the list.) The final column shows a SMARTS representation of the extracted substructure, with the attachment points denoted using the “A” atoms. These are the legal attachment points. (Note: While Pipeline Pilot was used to generate these results and uses the “*” atom rather than the “A” atom for attachment points; we use “A” here for consistency with the text.) One can create a table of features and corresponding SMARTS for a particular training set, then use that information to see a substructural example of any feature of interest.”

So while an identifier like “1499521844” reveals nothing, the corresponding substructure can be looked up. (Caveat: the mapping is often NOT one-to-one, due to collisions from hashing.) An example of this is displayed in the figure below for the FCFP pharmacophore fingerprint protocol.

ecfp-substructure-search
“A set of underlying substructures that all generate the FCFP_6 feature “1499521844”. (Legal attachment atoms are denoted using the “A” atom.) There are a number of reasons for the multiplicity of substructures. First, in FCFPs, the initial atom identifiers are abstracted and do not contain any connectivity information, hydrogen information, or explicit atom types, as do ECFPs. Second, information about the bond types to attachment atoms is not included in the feature. Third, rings that contain an attachment “A” atom may be opened at the attachment atom with no change of feature value. This combination of effects leads to a multiplicity of substructures; that said, the similarity among the structures is striking, and an abstraction that treats them the same is not without interest.”

Applications

Since their introduction around 2000, ECFPs have been widely applied across several areas:

Virtual Screening

  • Categorizing actives/inactives in noisy high-throughput screening data

Structure-Activity Modeling

  • Predicting bioactivity and properties from molecular structures

ADMET Prediction

  • Model pharmacokinetic behaviors like absorption, distribution, metabolism, excretion
  • Used for diverse endpoints: toxicity, clearance, drug-drug interactions

Compound Library Analysis

  • Analyze aspects of molecule collections besides activity (3D docking, diversity, etc.)

ECFP Implementation - Python

ECFP implementations exist in software libraries like RDKit, DeepChem, and others. We will first create a simplified version to illustrate the process. Next, we will show how to compute the actual ECFP using RDKit.

Before we proceed, we’ll need to install the necessary libraries, so run this in the command line terminal:

				
					pip install rdkit bitarray


Simple Python Implementation from Scratch

				
					# Imports
from rdkit import Chem
import hashlib
from bitarray import bitarray

# Helper function to flatten a list of tuples
def flatten(lst):
    return [item for sublist in lst for item in sublist]

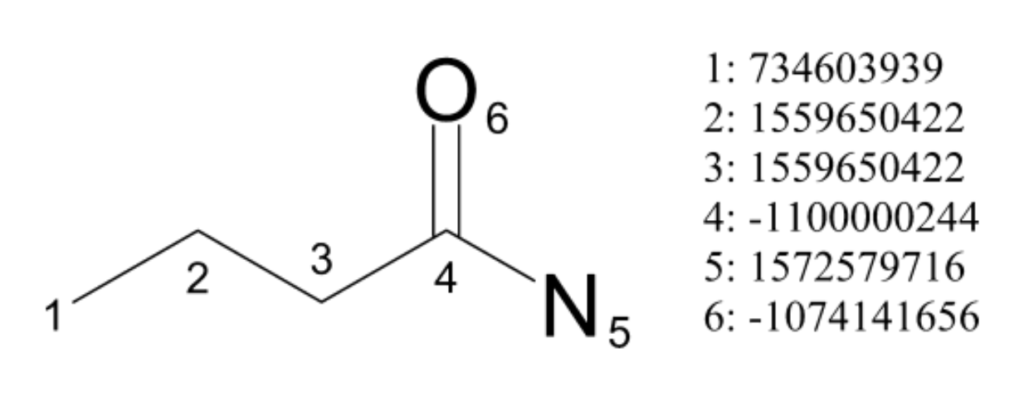
def atom_invariant(atom):
    """
    Generates a hash of atom invariants, capturing detailed properties of each atom.
    These properties help in uniquely identifying atoms based on their chemical environment.
    The hash of these properties serves as a compact identifier for the atom.
    (Note: does not include all properties covered in ECFP)

    Parameters:
    - atom: An RDKit Atom object.

    Returns:
    - A hash of a tuple containing atom properties including atomic number, total degree (bonds count including hydrogens),
      total number of hydrogens, explicit valence, atomic mass, formal charge, and ring membership.
    """
    properties = (
        atom.GetAtomicNum(),  # Atomic number, identifies the element type.
        atom.GetNumImplicitHs() + atom.GetNumExplicitHs(), # Number of attached hydrogens (both implicit and explicit)
        atom.GetExplicitValence(), # Explicit valence
        atom.GetMass(), # Atomic mass
        atom.GetFormalCharge(),  # Atom's formal charge.
        atom.IsInRing()  # Boolean indicating if the atom is part of a ring structure.
    )
    # Return the hash of the properties tuple
    return hash(properties)

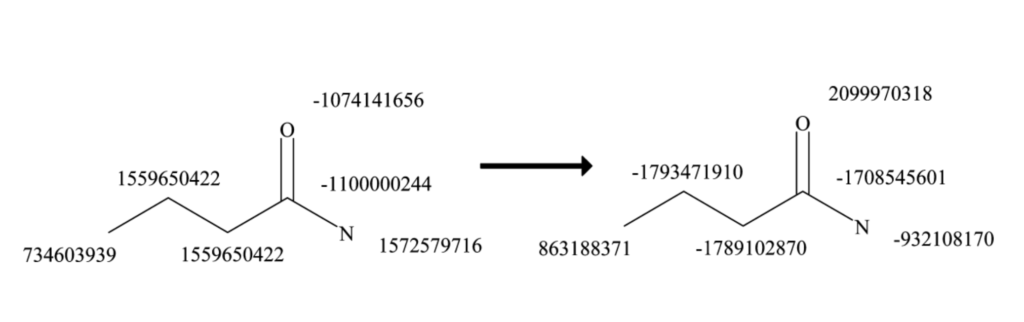
def get_neighborhood_hash(mol, atom_idx, iteration, previous_neighborhoods, hash_to_bonds):
    """
    Calculates a hash for the neighborhood of an atom at a given iteration depth,
    and tracks the bonds involved in that neighborhood. The hash and bond tracking
    are used to generate extended connectivity fingerprints (ECFPs).

    This function iterates over the neighbors of the specified atom, collects
    their properties and bond orders, and creates a hash representing the
    neighborhood's substructure at the current iteration. Additionally, it
    accumulates and updates the set of bonds involved for each unique neighborhood
    hash seen across iterations, supporting substructure tracking within the molecule.

    Parameters:
    - mol (RDKit Mol): The molecule being analyzed.
    - atom_idx (int): Index of the atom whose neighborhood hash is being calculated.
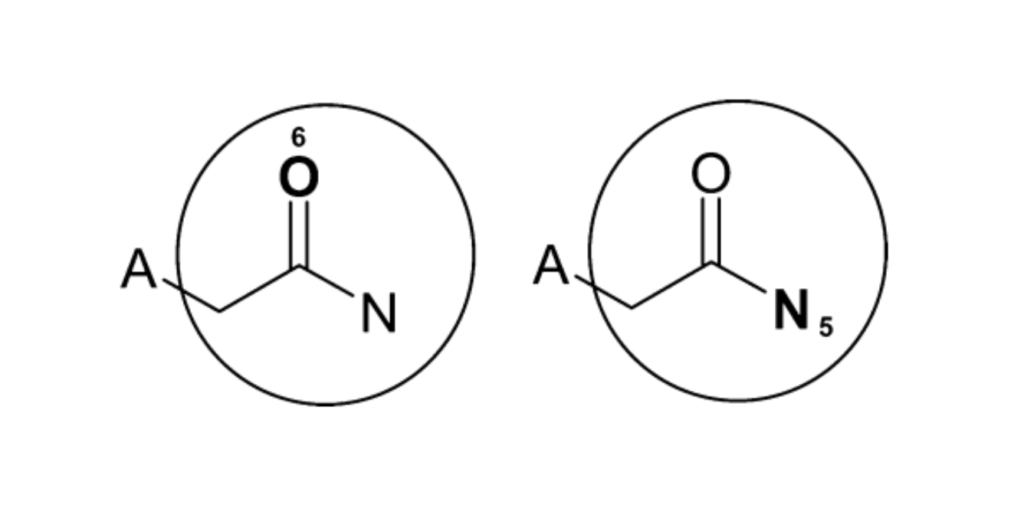
    - iteration (int): The current iteration depth, controlling the "radius" of
      the neighborhood being considered.
    - previous_neighborhoods (set): A set of previously encountered neighborhood
      hashes to avoid duplications.
    - hash_to_bonds (dict): A dictionary mapping unique neighborhood hashes to sets
      of bonds (as frozensets of atom indices and bond types) included in each
      neighborhood.

    Returns:
    - (tuple or None, set): A tuple containing the new neighborhood hash (or None
      if the neighborhood hash is not new) and the updated set of bonds for the
      current neighborhood. If the neighborhood hash is not new, it returns None
      instead of the hash to indicate that this particular neighborhood structure
      has been previously encountered.
    """

    ### STEP 1 - GET NEIGHBORHOOD HASH ###
    atom = mol.GetAtomWithIdx(atom_idx)
    # Start with a list containing the iteration number and the core atom's hash
    neighborhood = [(iteration, atom_invariant(atom))]
    bond_order_neighbor_pairs = []

    # Loop through neighbors and collect each neighbors bond order and hash
    for nbr in atom.GetNeighbors():
        bond = mol.GetBondBetweenAtoms(atom_idx, nbr.GetIdx())
        bond_order = bond.GetBondTypeAsDouble()
        neighbor_hash = atom_invariant(nbr)
        bond_order_neighbor_pairs.append((bond_order, neighbor_hash))

    # Sort the neighbor pairs by bond order, then by neighbor hash
    bond_order_neighbor_pairs.sort()

    # Extend the neighborhood list with the sorted neighbor information
    for pair in bond_order_neighbor_pairs:
        neighborhood.append(pair)

    # Flatten the list and convert to a tuple for hashing
    neighborhood_tuple = tuple(flatten(neighborhood))

    neighborhood_hash = hash(neighborhood_tuple)

    # Check if the neighborhood hash is new before adding it to previous_neighborhoods
    is_new_hash = neighborhood_hash not in previous_neighborhoods

    ### STEP 2 - BOND TRACKING ###
    # Initialize an empty set to accumulate bonds for the current neighborhood hash.
    accumulated_bonds = set()

    # Accumulate all bonds associated with the core atom and its neighbors from the previous iteration
    if iteration > 0:
        for prev_hash, prev_bonds in hash_to_bonds.items():
            if any(atom_idx in bond_atoms for bond_atoms, bond_type, iter_num in prev_bonds if iter_num == iteration - 1):
                accumulated_bonds.update({(bond_atoms, bond_type, iter_num) for bond_atoms, bond_type, iter_num in prev_bonds if iter_num == iteration - 1})

    # Collect bonds for tracking, using frozenset for non-directionality (in the context of molecular graphs, a bond between
    # atom 0 and atom 1 is the same as a bond between atom 1 and atom 0)
    # Each element of the bonds set is a tuple where the first element is a frozenset identifying the bond by the indices of the atoms
    # involved, and the second element is the bond type represented as a double. This allows tracking both the connectivity
    # and the type of each bond.
    for nbr in atom.GetNeighbors():
        bond = mol.GetBondBetweenAtoms(atom_idx, nbr.GetIdx())
        accumulated_bonds.add((frozenset({atom_idx, nbr.GetIdx()}), bond.GetBondTypeAsDouble(), iteration))

    ### STEP 3 - UPDATE AND RETURN ###

    # Updating ID set and initial collection of bonds for this neighborhood, if it's a new hash
    # Decide on what to return based on whether the neighborhood_hash is new
    if is_new_hash:
        # Add hash to the unique set of IDs passed in during the ecfp call
        previous_neighborhoods.add(neighborhood_hash)
        hash_to_bonds[neighborhood_hash] = accumulated_bonds
        return neighborhood_hash, accumulated_bonds
    else:
        # Update the existing entry with newly accumulated bonds
        hash_to_bonds[neighborhood_hash].update(accumulated_bonds)
        return None, accumulated_bonds

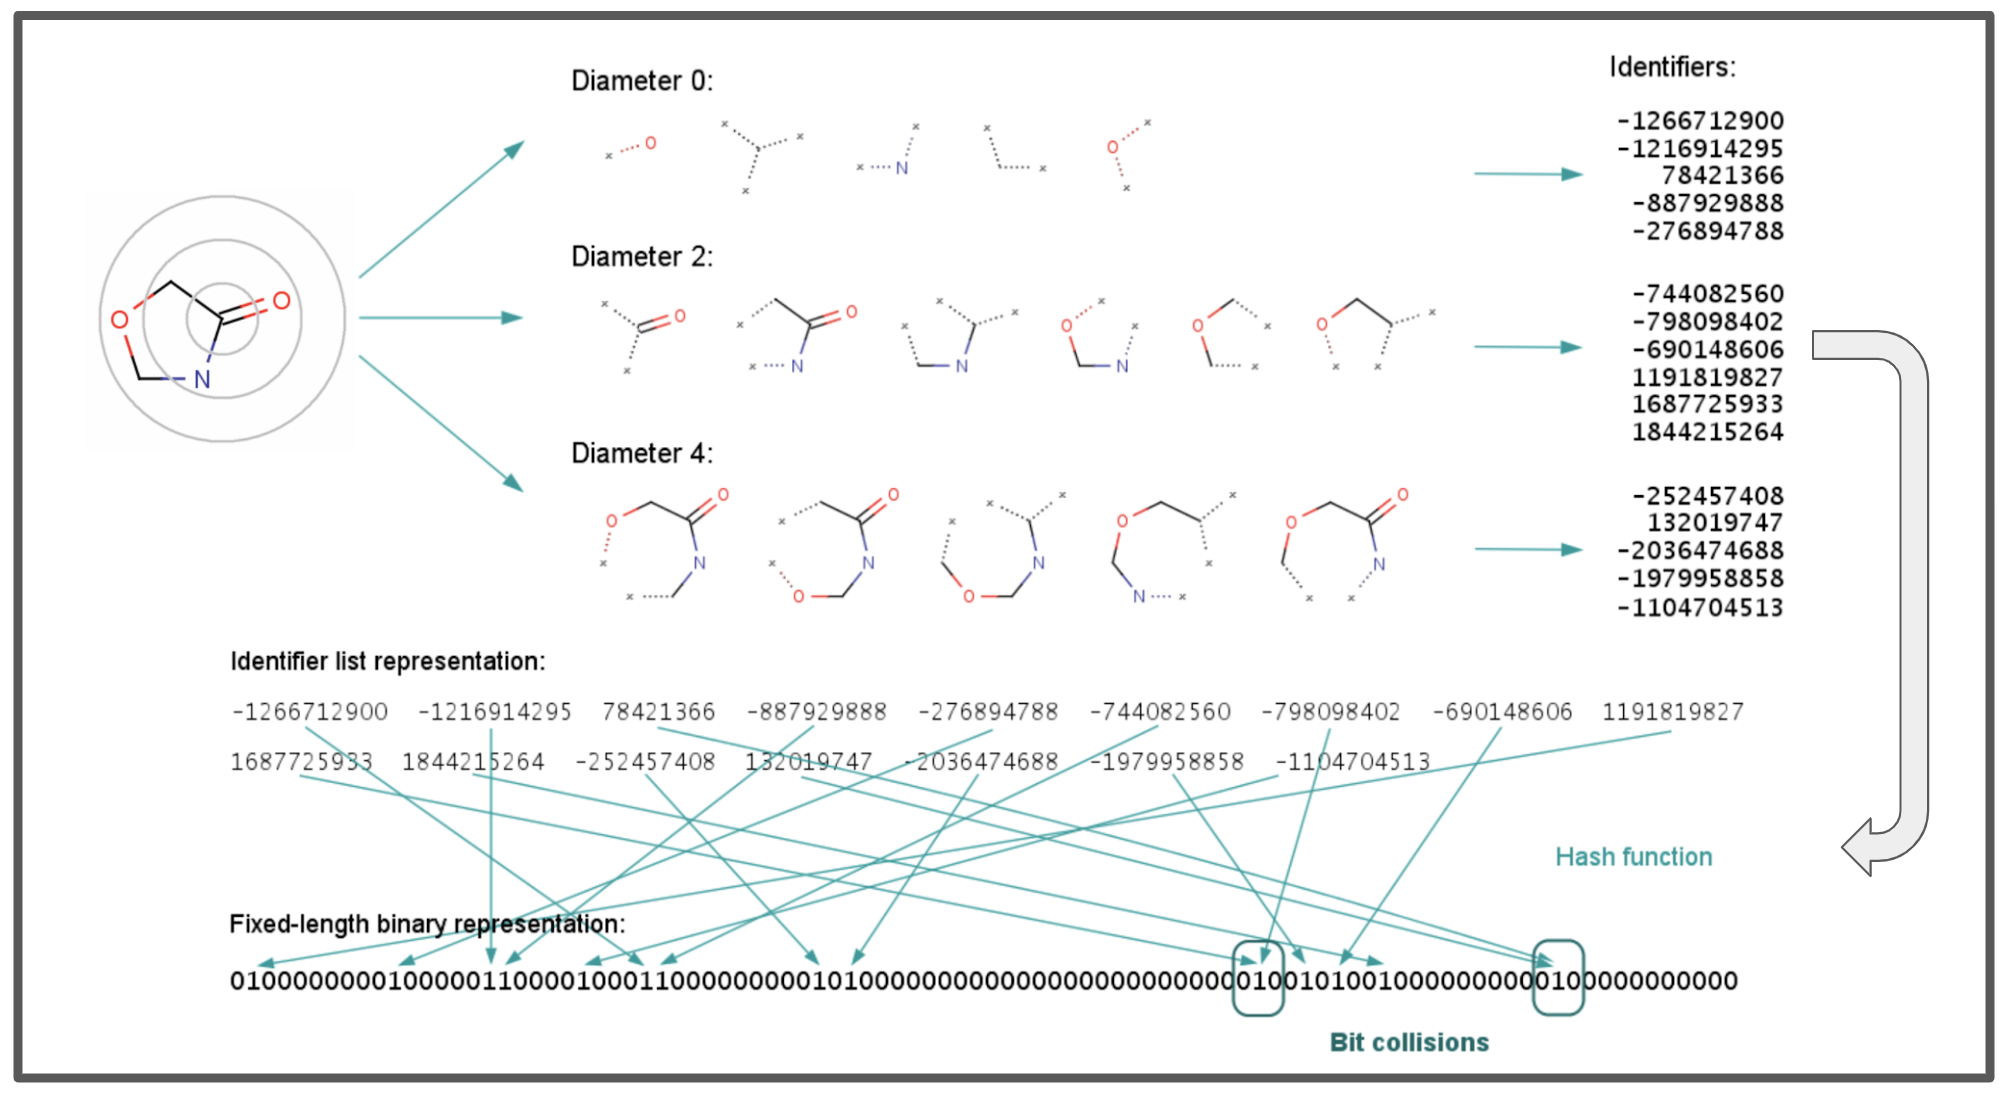
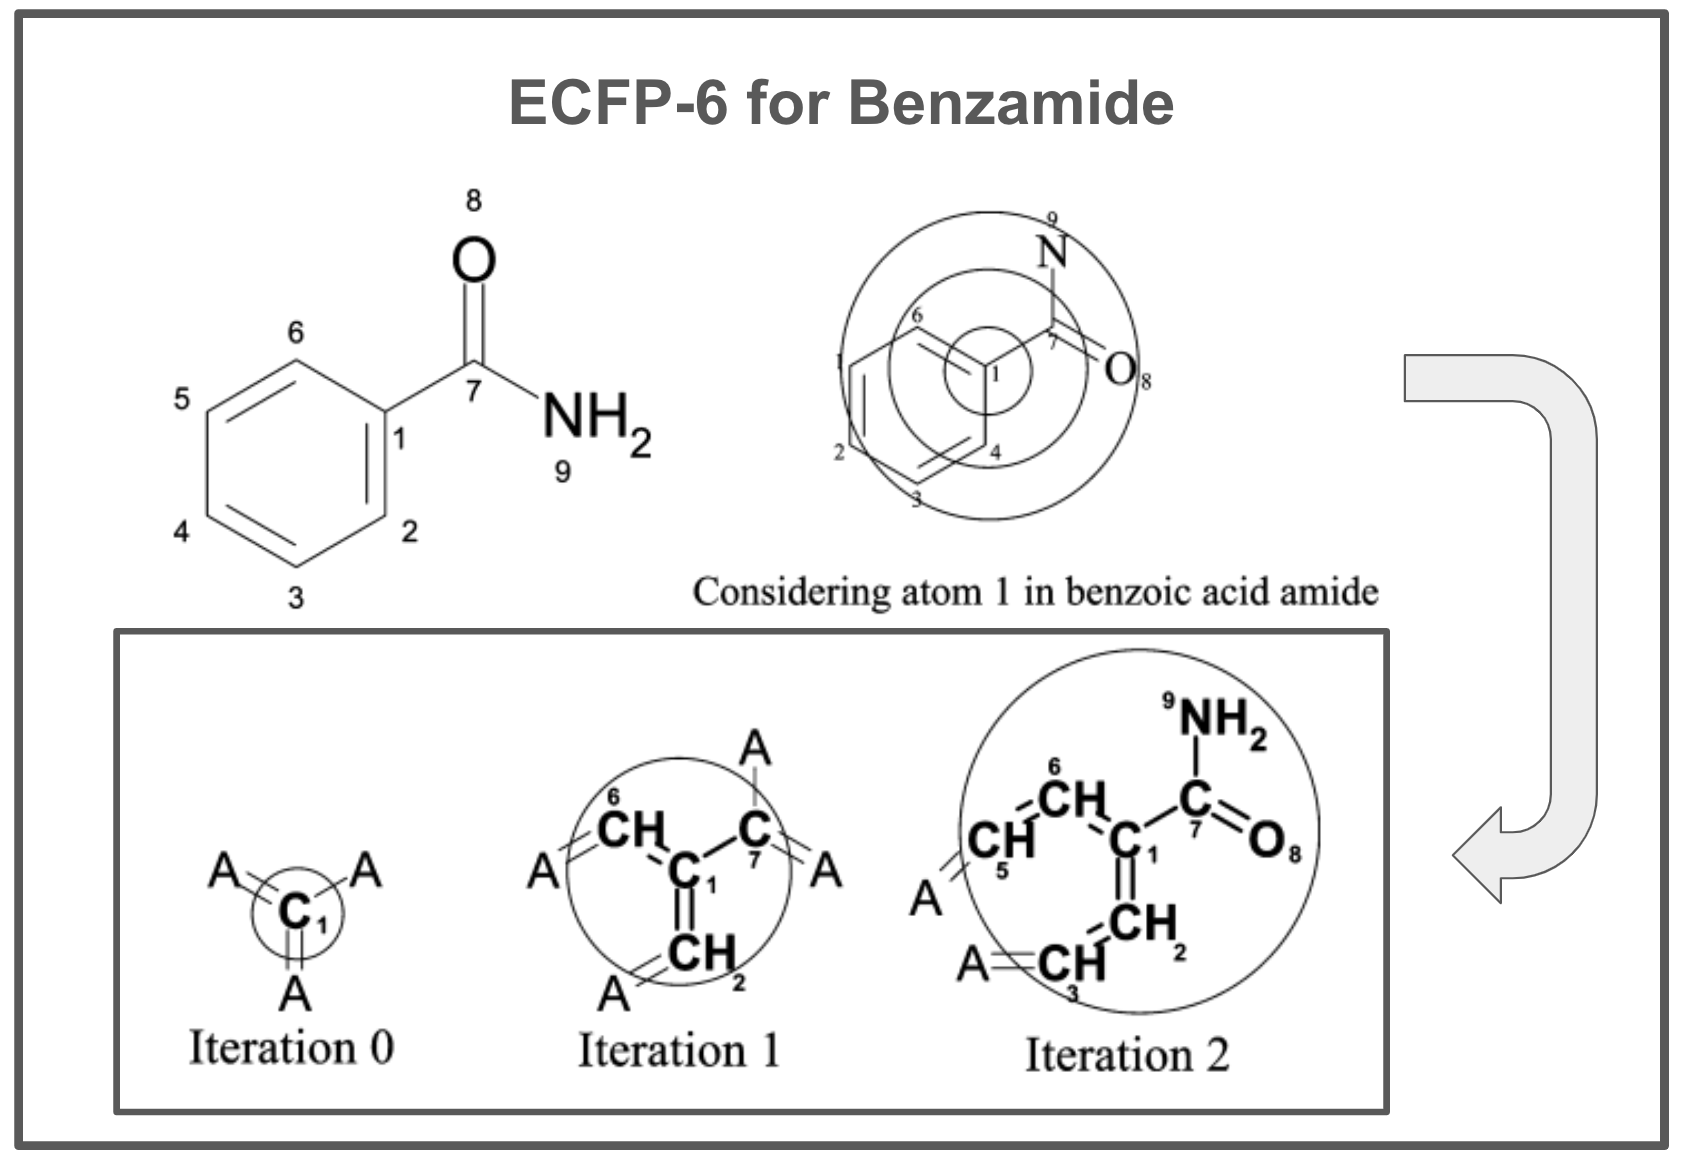
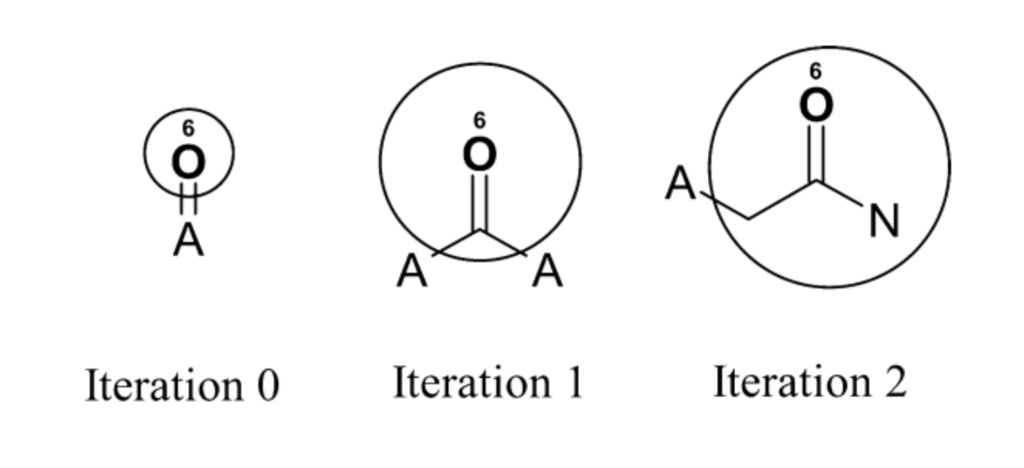
def ecfp(mol, radius=2):
    """
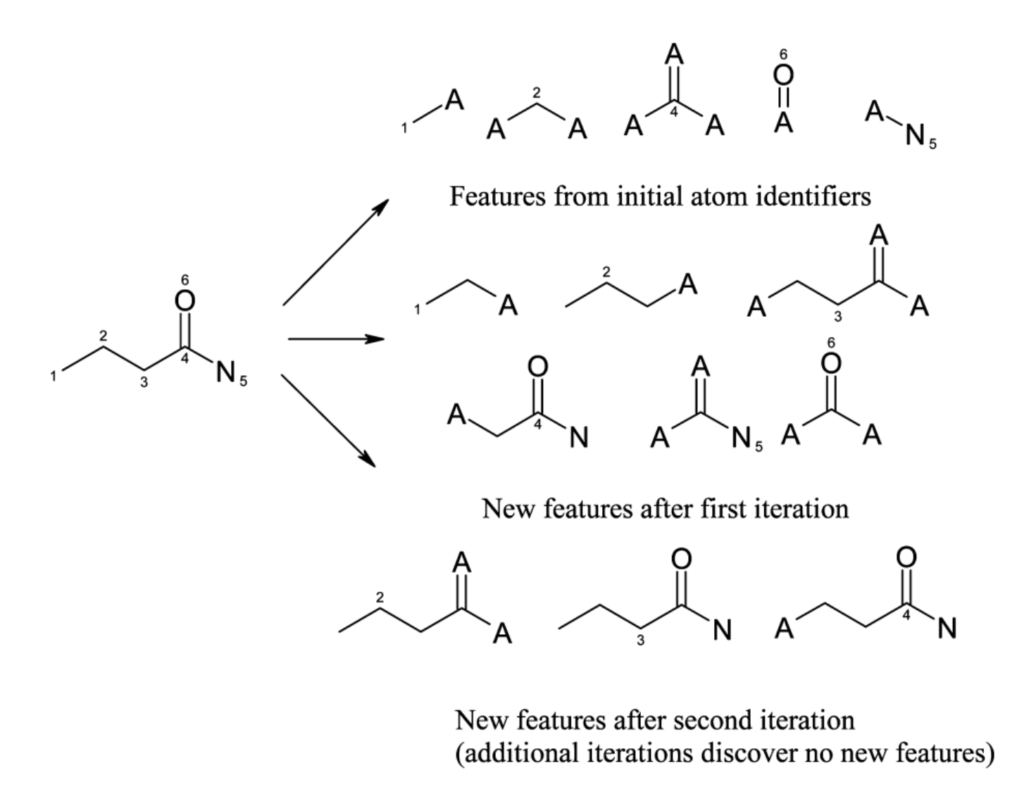
    Computes the Extended Connectivity Fingerprint (ECFP) for a given molecule, starting with iteration 0
    for just the atom identifiers, then expanding in further iterations. Additionally, collects all unique
    identifiers generated throughout the iterations.

    Parameters:
    - mol: An RDKit Molecule object.
    - radius: The radius of neighborhoods to consider, corresponding to the iteration count.

    Returns:
    - A bitarray representing the ECFP of the molecule.
    - A list of all unique identifiers generated through all iterations.
    - A set of "tracked bonds and substructures"
    """
    fp_length = 2048  # Length of the fingerprint bitarray.
    fingerprint = bitarray(fp_length)
    fingerprint.setall(0)

    all_unique_identifiers = set()  # Set to keep track of all unique identifiers generated

    hash_to_bonds = {}  # Dictionary to map unique hashes to their bonds

    for iteration in range(0, radius + 1):
        for atom_idx in range(mol.GetNumAtoms()):
            if iteration == 0:
                # Directly use atom_invariant as the unique identifier without neighbor info
                atom_hash = atom_invariant(mol.GetAtomWithIdx(atom_idx))
                # Add to the set of unique identifiers
                all_unique_identifiers.add(atom_hash)
                # Map the atom's hash to a position in the fingerprint and set the bit
                bit_pos = int(hashlib.sha256(str(atom_hash).encode('utf-8')).hexdigest(), 16) % fp_length
                fingerprint[bit_pos] = 1
            else:
                # Include neighbor information in subsequent iterations
                neighborhood_hash, bonds = get_neighborhood_hash(mol, atom_idx, iteration, all_unique_identifiers, hash_to_bonds)
                # print(neighborhood_hash)
                if neighborhood_hash is not None:
                    # Add to the set of unique identifiers
                    all_unique_identifiers.add(neighborhood_hash)
                    # Store the bonds for this unique hash
                    hash_to_bonds[neighborhood_hash] = bonds
                    # Map the hash to a position in the fingerprint and set the bit
                    bit_pos = int(hashlib.sha256(str(neighborhood_hash).encode('utf-8')).hexdigest(), 16) % fp_length
                    fingerprint[bit_pos] = 1

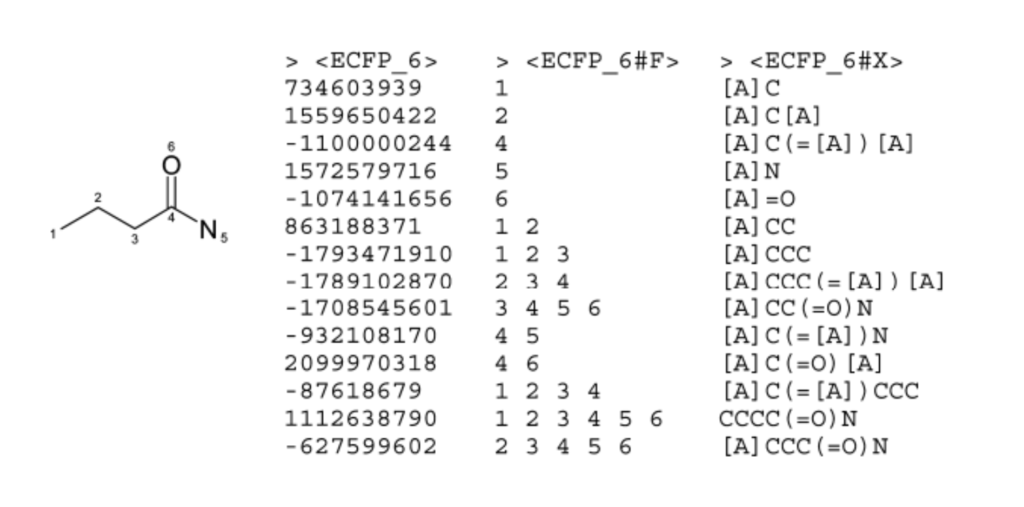
    # Convert the set of all unique identifiers to a list
    unique_identifiers_list = list(all_unique_identifiers)

    return fingerprint, unique_identifiers_list, hash_to_bonds


And to put it all together, we run the ecfp function using butyramide as an example:

				
					# Example using butyramide
smiles = 'CCCC(=O)N'
mol = Chem.MolFromSmiles(smiles)

fingerprint, ids, bond_tracking = ecfp(mol, radius=3)


RDKit Implementation

RDKit offers a ton of functionality for computing a variety of molecular fingerprints, including ECFPs, in just a few lines of code. This “Getting Started in Python” guide is an excellent resource. Here is an example of calculating ECFPs for butyramide using RDKit.

				
					from rdkit import Chem
from rdkit.Chem import rdMolDescriptors, AllChem
import numpy as np

def ecfp_from_smiles(smiles, radius=3, nBits=2048):
    mol = Chem.MolFromSmiles(smiles)
    fp = rdMolDescriptors.GetMorganFingerprintAsBitVect(mol, radius, nBits=nBits)
    # Convert the RDKit explicit bit vector to a Numpy array for easier use
    np_fp = np.zeros((1,))
    Chem.DataStructs.ConvertToNumpyArray(fp, np_fp)
    return np_fp


					smiles_string = 'CCCC(=O)N'
fingerprint = ecfp_from_smiles(smiles_string)


RDKit provides comprehensive fingerprint information, which can be obtained through various methods. For example, from the RDKit docs:

“The fingerprint generators can collect information about the atoms/bonds involved in setting bits when a fingerprint is generated. This information is quite useful for understanding which parts of a molecule were involved in each bit.

Each fingerprinting method provides different information, but this is all accessed using the additionalOutput argument to the fingerprinting functions.

Information is available about the atoms that contribute to particular bits in the Morgan fingerprint via the bit info map. This is a dictionary with one entry per bit set in the fingerprint, the keys are the bit ids, the values are lists of (atom index, radius) tuples.”

As an example:

				
					m = Chem.MolFromSmiles('CCCC(=O)N')
fpgen = AllChem.GetMorganGenerator(radius=3)
ao = AllChem.AdditionalOutput()
ao.CollectBitInfoMap()
fp = fpgen.GetSparseCountFingerprint(m,additionalOutput=ao)
print(len(fp.GetNonzeroElements()))
info = ao.GetBitInfoMap()
print(len(info))


Conclusion

Thanks for reading! Next up, we’ll cover graph neural networks for learning molecule fingerprints. So stay tuned!

References & Resources

Thank you for reading! 

If you enjoyed this post and would like to stay up to date then please consider following me on Medium

You can also find me on LinkedInTwitter or Instagram (@musicalchemist), GitHub, or YouTube. 

Facebook
Twitter
LinkedIn
Pinterest

Leave a Reply

Your email address will not be published. Required fields are marked *